Intro
With the huge popularity of Klipper (which mandates the need of a single board computer [SBC]) and Rep Rap Firmware (Transitioning towards the same architecture as Klipper), the need for sourcing an SBC alongside your printer controller board has become the norm. Currently, the world supply chain for the ever-popular Raspberry Pi series is struggling to keep up with demand and prices have soared. The Fly Gemini is potentially the start of a new era of a combined single PCB printer controller and SBC which look to combine functionality and use lesser-known Core chips (meaning better availability) for the Linux side.
The Fly Gemini is made by Fly and Mellow in collaboration and can be purchased only on Aliexpress right now. Currently, V1 is available, the version I have reviewed was the Beta board. This Beta was part of a reduced cost release and was purchased with my own money.
Specifications
As the Gemini essentially combines the SBC and printer control board into a single board I’ll discuss the specifications for each half. They are essentially wired up together internally and the method of this connection varies depending on the position of a set of dip switches. There are two settings one for Klipper and one for RRF. The total size of the board is quite small at 150*84mm.
The SBC is based on the Allwinner H5 processor (Datasheet available here). It comes with the same amount of RAM as the Pi Zero W (which has been shown to reliably run Klipper + Mainsail without issues). The downside here is that there is no onboard Wi-Fi support. The board does feature a decent speed ethernet port and it is very easy to add a USB Wi-Fi dongle. Check out my installation guide for a full look at doing that. The board also features a micro-HDMI output which can be really handy when setting up the device if you are having any network related issues because you can also plug in a mouse and keyboard and interact with the terminal directly to find out the IP address etc.
- processor: Quad core Allwinner H5 1GHz
- RAM: 512M DDR3
- GPU: ARM Mali450
- MicroSD
- USB Host2.03 USB-OTG1
- UART2 SPI2
- Micro HDMI*1
- Ethernet: 100M
The Printer controller portion of the board is based on the commonly used STM32 series chip which is used in many of the existing boards we know and love (SKR Pro 1.1 for example). The features available on the board align pretty much with its closest competitor boards such as the SKR mini. For your money, you get 4 independent motor drives (enough for most single extruder printers not using fancy bed levelling kinematics), 2 thermistors inputs and 2 controllable fan outputs. That said one of those fan outputs needs to be 5v or you will need to run the hot end fan from the always-on port to get 12 or 24v support. A nice little perk though that does set this board out above most of the other smaller printer controller boards is that it is high voltage TMC5160 driver compatible. They state that it has been tested up to 48V which isn’t as high as some of the other boards on the market but should be more than enough for more speed demons.
- Microprocessor: ARM Cortex-M3 STM32F405RGT6
- Mainboard Input voltage: 12/24V
- Drive Voltage: 12-48V
- 4 stepper drives (TMC2209/TMC5160)
- Drive IO protection for accidental shorting etc. (Up to 30V)
- 2 controllable fan outputs (1x5V and 1x selectable voltage 5/12/24V)
- 1 always on fan output
- Replaceable fan MOS
- LCD expansion headers
- BLTouch header
- USB to CAN module port
- 1 hotend heater output
- 1 bed heater output
- 2 thermistor inputs
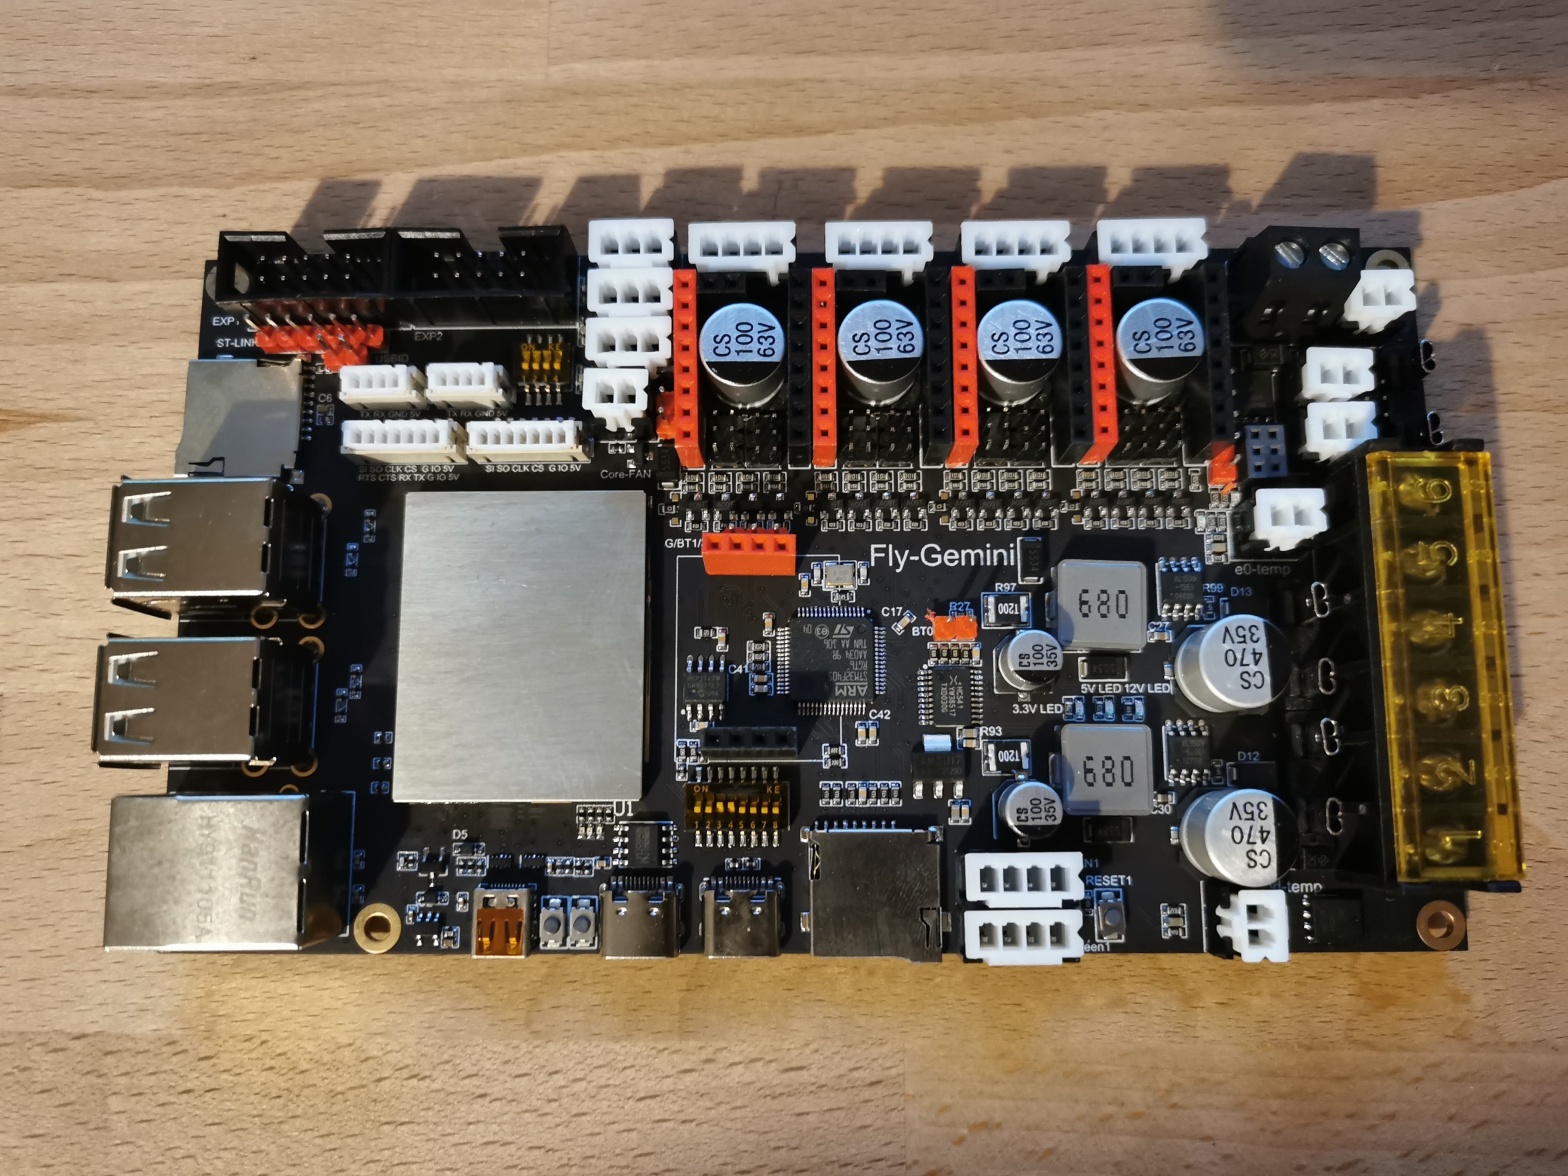
Take a look below at the boards layout and pin number scheme. It is quite a neat board in terms of wiring it up because all the connections are nicely grouped towards the outer edges of the board.

Price
At the time of writing this article the basic board comes in at £42.80 + taxes. For the UK this works out at £51.36. The full works (4×2209 stepper drivers, 32gb SD card preloaded with klipper and a 5g wifi dongle) would cost £65.02 + taxes. For the UK this works out at £78.02. Both options come with the free faster aliexpress shipping we are accustomed to nowadays.
Let’s take the the closest equivalent setup and see how it compares pricewise to a typical Klipper and RRF setup cost.
| Fly Gemini | Klipper (Pi zero 2 W+ SKR mini + 42209 drivers) | RRF (Pi Zero + Duet Mini 5+) |
| Fly Gemini (£78.02) | Pi Zero (£13.20) | Pi Zero (£13.20) |
| 32gb SD card (£7) | SKR mini (£43.60) | Duet mini 5+ (£136.50) |
| 5v Power supply (£8) | 5v Power supply (£8) | |
| usb wire (£2) | usb wire (£2) | |
| 32gb SD card x 2 (£7) | 32gb SD card x 2 (£7) | |
| Total: £85.02 | Total: £80.80 | Total: £156.70 |
As you can see if we were actually able to get hold of the Pi Zero 2 W then the equivalent original klipper setup does come in slightly cheaper than the Gemini. That being said right now that is a very big IF. And as soon as you start looking at other variations of the Raspberry Pi or paying above RRP then the price soon swings in the Gemini’s favour.
For a RRF setup it’s a hugely cheaper solution when compared to the original Duet board. That said the Duet board have always been made to a higher quality than most other boards and a hands on experience using both confirms this still to be true. The Gemini is much easier to break and has some annoying missing features. But for half the price It is a very cost effective entry point into the RRF ecosystem.
Unboxing
The control board comes in the standard Mellow blue box. It is well protected with 2 layers of foam padding. The stepper drivers you choose will arrive in a small plastic box and come with some nice little heatsinks. Also inside the box is a short USB C wire (useful for the initial config). In addition to that there are some fuses, a bunch of jumpers for stepper configuration and some smaller jumpers for fan voltage configuration. A really nice touch is that for every single connection on the board the correct connector and pins are provided. This means no having to buy extra connectors if your old board used a different standard. Lastly there is a little labelling sticker which you can add to the screw terminal because there is no silkscreen labelling for those.
Inspection of the PCB shows quite a hefty PCB compared to most printer control boards I’ve seen before. It is a 4 layer board presumably to account for the complexity around the SBC being onboard. I couldn’t see any obvious bad solder joints or any loose components.


Setup
Setting up the Fly Gemini is much like any other Klipper setup. Unfortunately I haven’t tested it on RRF but sd card images are provided and there is actually a larger active support community for it.
Setting up the Fly Gemini to run well on Klipper and Mainsail was not an easy task. That said now I’ve gone through and documented it the steps should be quite straight forward to follow as it was the de-bugging that was a challenge. See my guide here – Installing Klipper and Mainsail on Fly Gemini. In addition to this I’ve spoken to Fly maker and the software team behind this product and there is a new SD card image in the works which will include all of my fixes. So hopefully by the time you could get your hands on one the process will be much smoother.
I’ve covered the extra steps needed to setup klipper and mainsail as well as a guide for using the Fly Gemini on the Voron 0.1. Lastly I also covered the extra steps on how to add a webcam in my tutorial posts building up to this review. See links to those below
Setup on Voron 0.1
Adding a webcam stream
Wiring up the board is pretty straight forward and similar to most other boards you may have used in the past. My guide above for the Voron 0.1 is probably relevant to most printers. Some key points that need to be covered are the jumper positions for the stepper motors, Not forgetting to put the fan mosfet and voltage jumpers in and not forgetting to install the fuses. Lastly if you are not using a high voltage supply for the stepper drives then you will need to also provide 12/24v to those inputs by either adding wire jumpers from the board power inputs or extra lines from your power supply. Below are two images showing the position for the stepper jumper for operating in UART mode (default method for TMC2209 drivers) and an example to jumping the power supply for 24v use only.


One key setup difference when using klipper with this board (and every other mellow board I’ve used recently) compared to others is that the step duration must as follows: step_pulse_duration: 0.0000004 or you will get lost steps.
Performance
Print performance is on par with the RPi + SKR mini setup that I had in the Voron 0.1 (using stock print speeds and accelerations) before trialling this board. Honestly, I wouldn’t expect to see any improvements because the printer controller side isn’t doing anything fundamentally different. I could, of course, have run it at 48V and been able to increase my speeds but I did not have a suitable power supply around and quite frankly the cooling on the V0.1 is the limiting factor long before the movement speeds. The TMC2209 drivers I used performed very similar to all other step stick style ones I’ve used. It’s worth noting they do have a tiny little switch on them that can be used to connect or disconnect the pin that is required for sensorless homing. This is a nice little feature as it avoids needing to crack out the soldering iron and bridge a jumper like on many other stepper driver breakouts. I should also say that 1 out of the 4 that came with my kit was dead on arrival. Mellow was very good, they asked a few questions to check it had been installed correctly and then sent out a replacement when they were happy I hadn’t just missed a step somewhere. This is a +1 for mellows customer service but if I hadn’t got a spare already this would have been quite frustrating.


The web UI is responsive. I was able to use all of the built-in features across multiple devices at the same time without any issues. This includes a single webcam stream which did increase the ram and CPU usage by quite a lot. I rarely witnessed the CPU load go above 20%. I also ran the GCode visualisation on the highest setting and that could take a while to load (depending on part complexity) but then tracked the print progress nicely.

The thermal performance is again in line with my experience with other Step-stick drivers. I was able to run the board with only passive cooling (motors running at 0.5A currents) but I did start to see the odd temperature warning on my V0.1 when doing longer prints. I experience similar warnings on the pi when I have the back panel installed as well (the electronics bay has poor cooling when this panel is in place) so I’d put this down to a flaw in the Voron 0.1 design rather than this particular board.
I was able to use the HDMI output with no issues however I have seen quite a few reports of the HDMI port not working. I spoke to the Fly dev team on this subject and there is some work on changing some background settings on the images to try and reduce the behaviour (background Linux configuration stuff) that was causing the HDMI output to turn off. The current workaround for those struggling seems to be to wait for the board to fully boot up. Check this by accessing it via the web UI or SSH. Then you can plug in the HDMI. This is all a bit annoying but not really a deal-breaker as most people will not use the HDMI output at any point in the configuration or day to day use.
Conclusion
This board has a lot of potential especially in the current state of affairs regarding hard to source Raspberry Pis. The board itself is of good quality and directly matches the performance of a separate SBC and Printer controller board setup. Whilst currently the documentation and provided image are less than perfect there is just about enough to get you up and running (And hopefully my guides can get you the rest of the way).
It is missing one key feature and that is having 2 controllable and voltage selectable fans. I have been promised that this will be present in the next version of the board. Right now the workaround is to use the 5v controllable core fan (which actually only delivers 3v), an external expander board for more fan control or just use an always on fan for the hot end cooling.
Negatives accounted for the board does what it says on the tin and it does it well. It’s certainly not the very best board out there right now though due to the negatives above. so whilst I wouldn’t recommend this board to a total beginner right now I would recommend it to anyone who has a bit more experience in setting up and configuring printer controller boards. It could be a cost effective solution to not being able to get hold of a raspberry pi provided the cooling fan situation suits your needs
Join the discord to keep up to date and get involved in the upcoming projects! https://discord.gg/UJ3x2uzRQd
