WARNING: This guide is only for the V1 version of the board. Use the start of the post on configuring the V2 for the Voron 0 if you need to configure a V2 board. The steps here will not work on the V2.
Intro
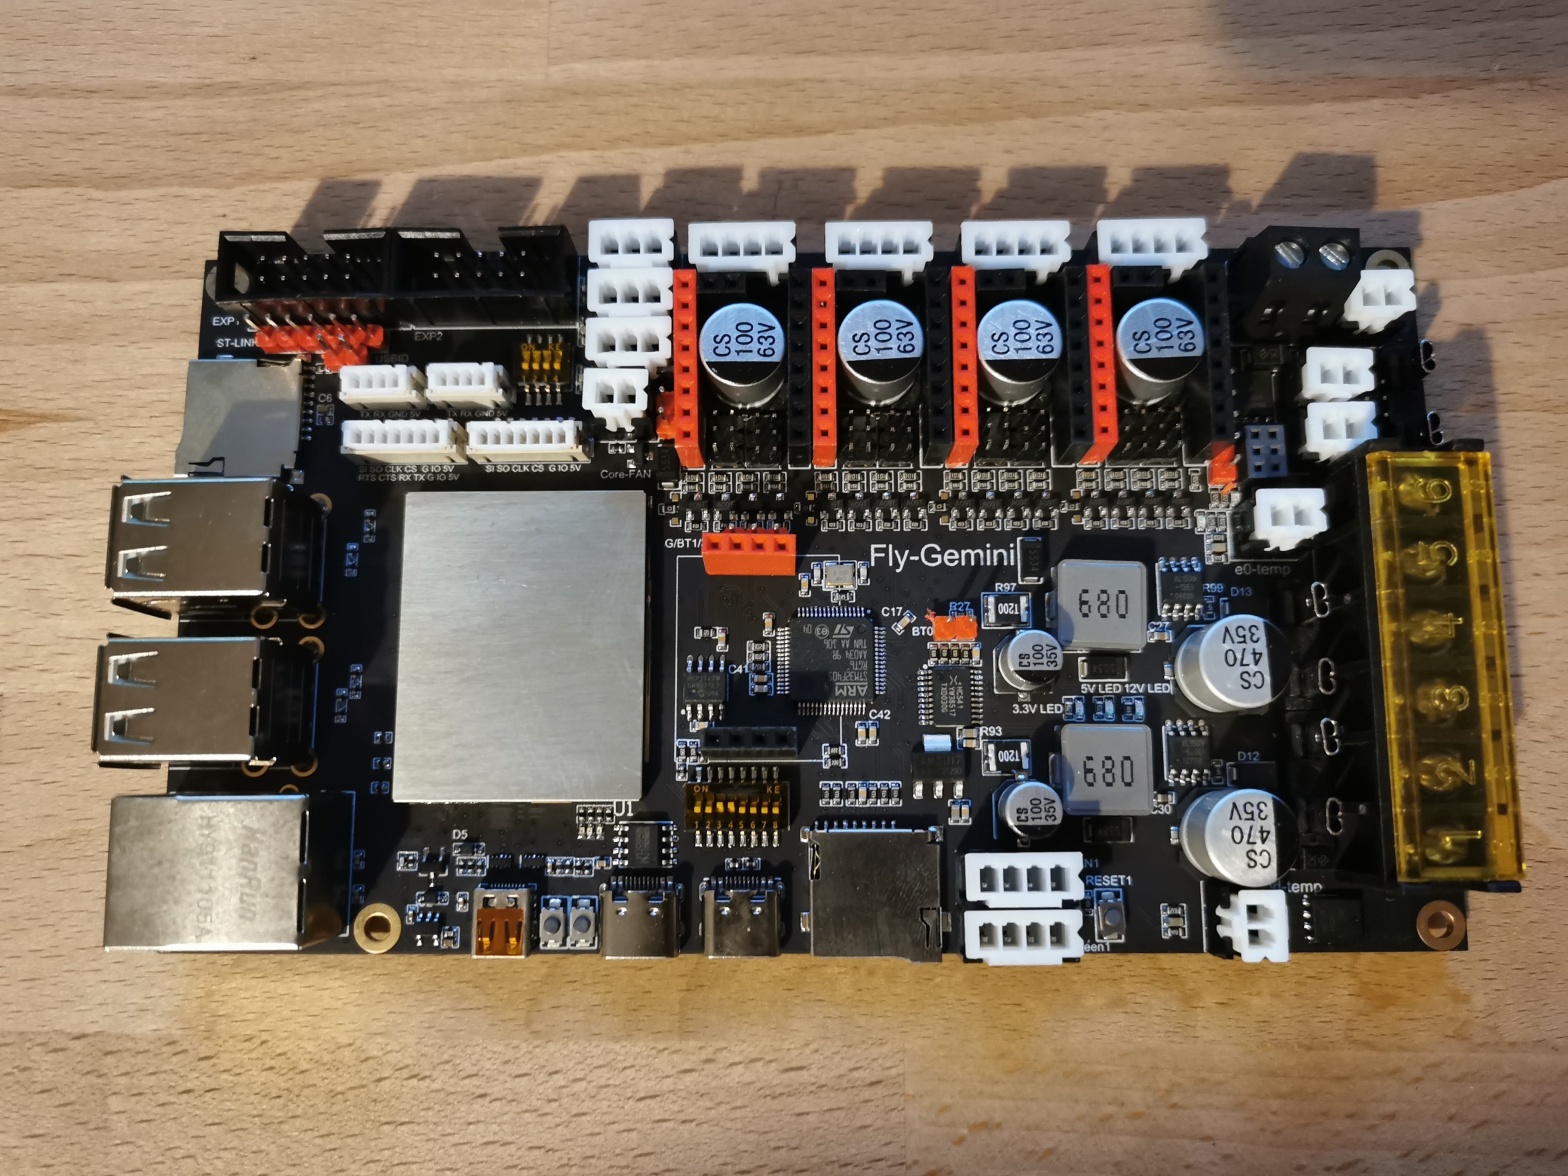
The FLY Gemini takes the Raspberry Pi and 3d printer controller board combo that is well known and loved by Klipper users and combines the functionality into a single efficiently sized board. Whilst it is compatible with both Klipper and RRF today I will be walking you through getting it set up to run Klipper. The image provided comes with Fluidd pre-installed but we will remove this and swap to Mainsail as it is my preference. In this article, I won’t specify how to configure it for a specific printer and will just take you up to the stage where everything is ready to start that process.
A full board review and a tutorial on how to set it up for a Voron 0.1 coming soon!
UPDATE: currently there is an issue with files saving. To ensure you changes to config.g before remove power from the board make sure you use the mainsail power menu to shutdown the pi otherwise changes to the files are lost. I have made the FLY team aware of this but as of yet it has not been fixed. The rest of this tutorial remains valid at this point in time.
UPDATE2: Other people within the BETA test of the board have been able to replicate the issue. It turns out it is actually an intended functionality within Armbian (see here) which causes a 10 minute write cycle to the SD card to preserve SD card life and reduce the chance of corruption. I have added a section to the bottom of this guide which give you the option to change the time between SD card writes but WARNING it has not been extensively tested.
BOM
Here is the bill of materials that I used for this tutorial. Other WiFi dongles and sd cards can be used but this is a tried and tested combination. Note do not exceed 32GB for the sd card for the printer controller side.
WiFi Dongle – Amazon
2 x fast 32gb SD Card – Amazon
FLY Gemini – Aliexpress

Tutorial
The process for setting up the board is documented fairly well for a newly released board from an Aliexpress supplier. They have published a tutorial here but it does assume a fairly good level of understanding. It also ships with the default interface for the printer as Fluidd which has recently seen some issues around maintenance and therefore many people moved over to Mainsail. For me I want to maintain consistency across my printers and therefore running Mainsail is necessary.
Follow the linked tutorial and download and write the image to one of the two SD cards. I prefer to use Raspberry Pi imager over balena etcher but the result will be the same.

If you are successful when you plug the sd card into the SBC SD card slot (the one by the USB A ports) and connect it to your PC via the USB C port you will notice that a COM serial device appears (much like an Arduino if you are familiar with those). Follow the instructions to set up Putty and if all goes to plan you should be greeted with this screen!

Interestingly during the wifi configuration, I had an issue with signal strength when I first tried to use nmtui but when I moved the wifi dongle to a different USB port it solved the issue. Note you cannot use the bottom right USB A port if you are using Klipper. The jumpers on the board must be set so that 3 and 4 are in the on position and this essentially makes an internal USB connection between the SBC and the IC for the control board (think of this as the USB wire that would traditionally connect your pi and printer, control board).
At this point you should have the SBC side of the installation up and running and should be able to see the fluidd interface at the ip indentified by running ‘ip a’ in the putty terminal.

Because all my other printers use mainsail I had to do some extra steps to install and configure that. Packaged with the image created by the Mellow team is KIAUH – If you follow the steps correctly you should get a screen like this

Uninstall fluid then install mainsail – note this can take some time just be patient. To use the tool follow the key displayed i.e. to go to the removal tool enter “3” then press enter. If everything is working the IP address you found in the earlier steps should now display mainsail instead of fluid!

At this stage, it is worth going to the machine tab and checking for updates. It is likely there will be quite a few that need to be processed. For security and the best experience, I suggest you do all of them.
I had an issue with system permissions at this stage and was unable to perform the system update. If you see an error like the one below then you have got the same problem.

To fix the permissions issue and allow upgrades to the system head back to the putty terminal for the Gemini board and enter the command ‘sudo visudo’. Note be very careful with this file it has the potential to break a lot of things about your Linux installation.

Scroll down to the bottom of the file (below the #includedir /etc/sudoers.d) and modify the line “%sudo ALL=(ALL:ALL) ALL” to say “%sudo ALL=(ALL:ALL) NOPASSWD: ALL”
You should now be able to go back to the web interface and check that updating the System section works without any problems.

Congratulations you made it this far, the SBC side of the Gemini board is ready to go! It is now time to create the Klipper image for the printer control board part of the Gemini. The instructions for this part aren’t exactly expansive “Compile Klipper firmware for stm32″… Anyway here is how I usually do it.
Run the following commands in the Gemini putty window.
cd ~
cd klipper
make menuconfig
Choose the STM32F405 option, This should then default to the settings below. Press q to exit and save.

Then run the following commands. You will see a text stream outputting that it is compiling a bunch of things from src. If everything has worked the last line will say creating hex file out/klipper.bin
make clean
make
You now just need to get this file, rename it to firmware.bin and load it onto the sd card. My preferred way of doing this is to use WinSCP to copy the file to my pc and then manually move it over onto the sd card. Create a new session in WinSCP and select the SCP file protocol. Enter the IP address and user info. Leave the port as the default 22.

If successful you will get a visual display of the file system on the Gemini. Go into the klipper file and the out file and copy the klipper.bin file onto your pc. From there copy it to the second sd card as you would normally.

Once loaded perform a power cycle on the board and then load up mainsail in your browser. If you have nothing connected to the board you should see something like the image below. This warning is a good sign because it means the SBC and the printer controller sides are communicating and unsurprisingly you have got a temp warning due to not having a thermistor connected for the hot end and heated bed.

That it you are done! Well almost, you are at least ready to configure your klipper installation using the printer.cfg file. I won’t cover that here as it is heavily printer specific. Information on the pins on the Gemini can be found here,
Reducing SD card write cycle time
The process is very simple you need to change the value that controls the save cycle time to SD cards. It is advised not to turn it off entirely so I chose to reduce it to 10 seconds which is a length of time I’m happy to wait after doing something before I can turn off the device at the wall.
SSH into the core using the same method via putty as before. Follow the steps below and then change the “commit=600” section to a value of your choice (It is in seconds so for a 10 second delay use 10). Save on exiting the file and then use “sudo reboot” to ensure the changes are saved!
cd ~
sudo nano /etc/fstab

sudo reboot
3 thoughts on “Fly Gemini (V1) Klipper Mainsail install”