
UPDATE: RatOS now now supports the manta and CB1 boards as of beta v2.0. I am leaving the guide below for reference but it is strongly advised to simply use the official RatOS route. Note changes since the guide was written have also broken some of the steps.
Hi guys, today I’m going to take you through the process of setting up the BTT Manta M8P and CB1 board. The Manta is a hybrid board with mounting point available for a Raspberry Pi compute module or BTTs own CB1 drop in replacement. It’s a HV compatible board that is a cost effective option for your VCore3! Be warned though installing RatOS from scratch requires you to be comfortable in the command line.

The Docs
The Manta boards are fairly well documented in terms of a controller board from a Chinese manufacturer. However there is not currently official RatOS support because of the work load required to support port it over to the standard the RatOS team wish to maintain. Blacksmithforlife wrote a really handy guide for doing the same thing on the OrangePi and it is the basis for this tutorial.
In the box
The Manta comes with the following items in the box
- BTT Manta M8P and CB1 board
- JST connectors for every port on the board
- Jumpers for the motor drivers and voltage selection
- Fuses for the power inputs and bed output (pre-installed)
- 8 x TMC2209 stepper drivers (if you ordered them)
- External WiFi antenna
- Thankyou card
- Rubber ducky!

The board looks fantastic and for an 8 driver board with combined SBC it is surprisingly compact (Don’t get me wrong it is still a big board but not as big as expected). The silkscreen is two colour and someone has put the effort into some nice graphics dotted around the board. Soldering looks very neat and I can’t see any poorly installed parts (On this board – the first one I was sent the USB C connector fell off…).


The CB1 board looks very similar to a CM4 module but features an external WiFi antenna.

Preparing the board
Add a jumper onto vusb to connect the USB connector power to the boards. We will use this to provide power while we install the OS and flash the firmware before wiring the board in. DO NOT LEAVE THIS JUMPER IN PLACE AND CONNECT USB + VIN AS YOU WILL BLOW THE USB CHIP.

Firmware
We will be using the CB1 board with RatOS installed manually over the top of a vanilla Klipper installation.
CB1 OS + Klipper install
Use micro SD card smaller than 32Gb. Download the image from BTT github pick the latest minimal version and download the .img.xz file. V2.2 at the time of writing which should have fixed WiFi connections on the CB1.

Use raspberry imager to write the image to the SD card.

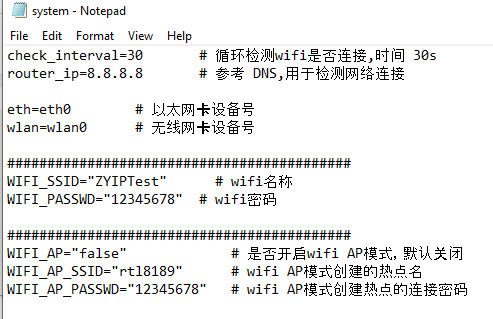
Now to configure the WiFi. The official guide says that in one of the partitions on the SD card you should be able to find the wpa_supplicant file however on my installation I didn’t get that. The video guide shows using the system configuration file and that was present so I used that. Open it in notepad.

Replace the SSID and password with that of the WiFi network you want the device to join. Save the file.
Plug the SD card into the micro SD card slot. Then plug in a USB C cable to power the board (If you don’t see a green light appear on the CB1 then it is not receiving power – In my case I had not pressed the CB1 board into it’s connectors firmly enough). I use Advanced IP Scanner to locate devices on my network. I find you are best to do a scan before you turn the device on and then repeat it and see which one appears. They often don’t have a useful name!

For me this was 192.168.68.119. Use PuTTY to SSH into the device. This will open a terminal. Trust the SSH key for the first time.
Login with username biqu and password also biqu

To make the scripts for RatOS work later we need to create a new user pi. Fill out your password and the other user data (You can leave them blank like I have).
sudo adduser pi
Add the user to the sudo group and then check that it worked.
sudo usermod -aG sudo pi
getent group sudo
Swap to the pi user. You will get visual confirmation as the username at the start of the command line will show pi@BTT-CB1 now.
su - pi
Update the system and make sure git is installed
sudo apt-get update -y
sudo apt-get install git -y
Clone Kiauh
git clone https://github.com/th33xitus/kiauh.git
Run the Kiauh script to and enter 1 to go to the install menu. We need to install Klipper, Moonraker and Mainsail.
./kiauh/kiauh.sh
Install Klipper using option 1. Choose python 2 and a single instance of Klipper when prompted. Also say yes to adding the user to the groups tty and dialout.

Install Moonraker using option 2. There shouldn’t be any options to choose for this one.

Install Mainsail using option 3. Choose Yes (Y) when prompted for all the options.

Lastly install KlipperScreen using option 5.

Now it’s time to step outside the standard Klipper install and begin getting RatOS installed. Press B and go back to the main Kiauh menu. Choose option 4 to enter the advanced menu.
Enter option 8 and acknowledge the warning.

Enter Y to create an example command.
Exit Kiauh.
Run the following set of commands. This will update your moonraker.conf file. You can copy the whole set of commands at once and paste them. They will run consecutively as if you entered them a line at a time.
mkdir /home/pi/klipper_config/config
echo 1.2.3-armbian | sudo tee /etc/ratos_version
echo "[update_manager RatOS]" >> /home/pi/klipper_config/config/moonraker.conf
echo "type: git_repo"  >> /home/pi/klipper_config/config/moonraker.conf
echo "path: /home/pi/klipper_config/config" >> /home/pi/klipper_config/config/moonraker.conf
echo "origin: https://github.com/Rat-OS/RatOS-configuration.git" >> /home/pi/klipper_config/config/moonraker.conf
echo "" >> /home/pi/klipper_config/config/moonraker.conf
echo "[update_manager RatOS-configurator]" >> /home/pi/klipper_config/config/moonraker.conf
echo "type: git_repo" >> /home/pi/klipper_config/config/moonraker.conf
echo "path: /home/pi/ratos-configurator" >> /home/pi/klipper_config/config/moonraker.conf
echo "origin: https://github.com/Rat-OS/RatOS-configurator.git" >> /home/pi/klipper_config/config/moonraker.conf
echo "primary_branch: deployment" >> /home/pi/klipper_config/config/moonraker.conf
echo "" >> /home/pi/klipper_config/config/moonraker.conf
echo "[update_manager RatOS-theme]" >> /home/pi/klipper_config/config/moonraker.conf
echo "type: git_repo" >> /home/pi/klipper_config/config/moonraker.conf
echo "path: /home/pi/klipper_config/.theme" >> /home/pi/klipper_config/config/moonraker.conf
echo "origin: https://github.com/Rat-OS/RatOS-theme.git" >> /home/pi/klipper_config/config/moonraker.conf
Next we need to install node. Again paste this entire set of commands in one go and run them.
curl -fsSL https://deb.nodesource.com/setup_16.x | sudo -E bash -
curl -sL https://dl.yarnpkg.com/debian/pubkey.gpg | gpg --dearmor | sudo tee /usr/share/keyrings/yarnkey.gpg >/dev/null
echo "deb [signed-by=/usr/share/keyrings/yarnkey.gpg] https://dl.yarnpkg.com/debian stable main" | sudo tee /etc/apt/sources.list.d/yarn.list
sudo apt update
sudo apt install nodejs yarn -y

Clone the RatOS repositories
cd /home/pi/klipper_config
git clone https://github.com/Rat-OS/RatOS-configuration.git config
sed -i 's/.*raspberry_pi.*/[temperature_sensor orange_pi]/' /home/pi/klipper_config/config/printers/base.cfg
git clone https://github.com/Rat-OS/RatOS-theme.git .theme
cd /home/pi
git clone https://github.com/Rat-OS/RatOS-configurator.git ratos-configurator
cd ratos-configurator/
git checkout deployment
Next run the install script
/home/pi/klipper_config/config/scripts/ratos-install.sh
next run the configurator script. If successful you should see an output like the one below.
/home/pi/ratos-configurator/scripts/setup.sh
Change write permissions on the following files
sudo chmod 775 /tmp/031-ratos-configurator-wifi
sudo chmod 775 /tmp/031-ratos-configurator-scripts
sudo chmod 775 /tmp/030-ratos-configurator-githooks
sudo chmod 775 /tmp/030-ratos-configurator-scripts
Next configure the RatOS service
cd ~
sudo touch /var/log/vcore.log
wget https://raw.githubusercontent.com/Rat-OS/RatOS/master/src/modules/ratos/filesystem/root/etc/init.d/ratos
sudo mv ratos /etc/init.d/ratos
sudo chmod +x /etc/init.d/ratos
sudo chown root:root /etc/init.d/ratos
sudo update-rc.d ratos defaults
sudo service ratos start
Configure the CB1 as MCU
cd /home/pi/klipper
cp -f /home/pi/klipper_config/config/boards/rpi/firmware.config /home/pi/klipper/.config
sudo make olddefconfig
sudo make clean
sudo make flash
sudo cp ./scripts/klipper-mcu-start.sh /etc/init.d/klipper_mcu
sudo update-rc.d klipper_mcu defaults
sudo chown pi:pi -R /home/pi/klipper
sudo service klipper_mcu start
Now enter the IP address in your browser and you should be greeted with the RatOS UI!


Flashing the MCU firmware
SSH back into the device if you exited it (Use user ‘biqu’ and password ‘biqu’) otherwise swap to the user by doing ‘su biqu’
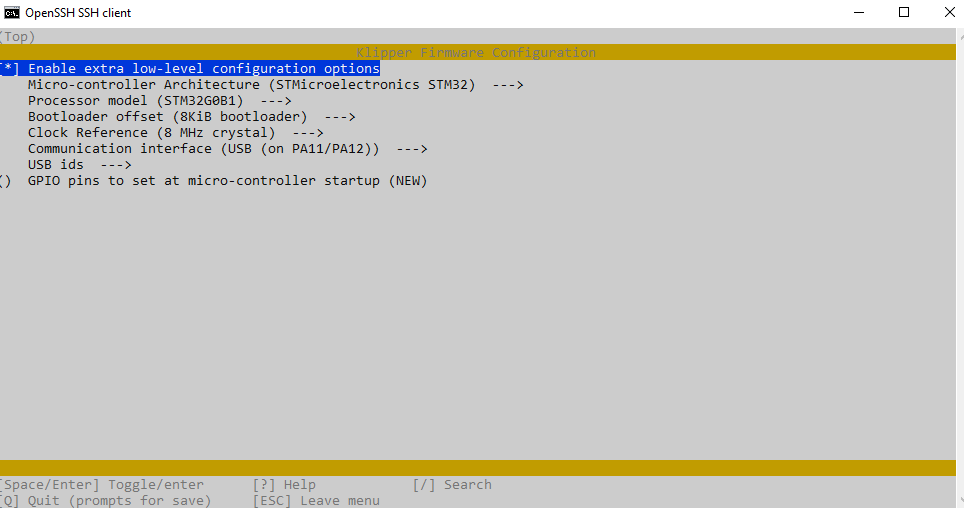
Navigate to the klipper directory and open the klipper menu.
cd ~/klipper/
make menuconfig
Change the settings to match the image below. Press q to exit and save when prompted.
Run make to compile firmware,”klipper.bin” file will be generated in
home/pi/kliiper/out folder when make is finished.
You now just need to get this file, rename it to firmware.bin and load it onto the sd card. My preferred way of doing this is to use WinSCP to copy the file to my pc and then manually move it over onto the sd card. Create a new session in WinSCP and select the SCP file protocol. Enter the IP address and user info. Leave the port as the default 22.

If successful you will get a visual display of the file system on the CB1. Go into the klipper file and the out file and copy the klipper.bin file onto your pc. From there copy it to the second sd card as you would normally.


Remove power from the Manta board and Insert SD card into the MCU-SD slot. Plug the USB C cable back in to turn the board back on.
Configuring Klipper
Head over to the BTT github and copy the contents of the config file into your printer.cfg.
We now need to get the board ID. Enter the command below and then copy the output and replace the one in the printer.cfg file.
ls /dev/serial/by-id/
Now restart the board and go back to the ip address and take a look inside mainsail. You should now see that your have communication with the MCU and if like me you like to set all the firmware up in advance you will get an error telling you the MCU has shutdown because an ADC is out of range. This is expected because you haven’t connected the thermistors yet! Congratulations you have reached the finish line. Now it’s time to go away and follow the wiring guide for your specific printer!

Updates
My Klipper and Klipper screen were ‘dirty’ after completing the install using the image provided by BTT. I am not 100% of the changes they had made and the effects of hard resetting these just yet but clearing them didn’t seem to break the basic printer functionality.
To update Klipper in the future you will need to use the hard reset on both and this will then enable you to receive Klipper updates.


Support 3DP and ME! Help us keep producing tutorials, content and mods!
£5.00

Hello sir!
Thank you for this.
After exit kiauh you need to create a config folder inside klipper_config.
Otherwise the next set of commands will not work and return a “no such file or directory”
LikeLike
after creating the config folder it has to be removed in order to continue. Otherwise it will return “already exists and is not empty”
sudo chmod (4 of them) only work after the setup.sh
Example of printer.cfg for this board to work.
Will be updated as soon as I have time to test everything else like input shaper, etc.
USE AT OWN RISK
https://pastebin.com/ixMurce4
After everything is working, Macros groups should be created in order to look like “normal” RatOS
LikeLike
READ THE EXAMPLE CAREFULLY
LikeLike
Thank you so much for the feedback I will add In the steps. I had to redo things a few times to get it to work and clearly I missed a few steps/the order needed modifying slightly!
Appreciate you taking the time to list the fixes!
LikeLike
You welcome David 😉
I’m glad I can give something back 😛
LikeLike
BTW, the read carefully and use at your own are for the less experienced ones 😉
LikeLike
Hi, Thanks for this walkthrough. I have ventured out the same path with the same document as a starter. I have come a long way but realy struggle with the ADXL wiring and pinout as BTT’s github and documentation is a bit of a mess. It refers to SPI 1 but the board says SPI2 on the connectors. Also I have emailed them for support and they tell me CS_PIN is PD9, but that can;t be, because that is the Enable-pin for motor 8,…
Do you have any software tips for configuring and maybe even a wiring diagram to the SDO, SDA, SDL and CS pins? Maybee good to figure this out and make your guide even more complete!
Thanks again,
Arthur
LikeLike
Unfortunately not yet but after I move house (this week hah) and have settled in I was going to do input shaping on the m4p which has similar outputs so I can at least get a start on it. The printer that the m8p is installed on is still WIP and a while away as waiting on parts from being able to test input shaper
LikeLike
In my printer.cfg I now have
[adxl345]
spi_bus: spi1
cs_pin: PB15
I have wired as such:
SCL – PA5 SCK
SDA – PA7 MOSI
SDO – PA6 MISO
CS – PB15
VCC – 3.3V
GND – GND
This seems to work. Maybe for your refference also handy?
LikeLike
Awesome dude that’s super helpful. Thank you for feeding the info back!
LikeLike
As per my promisse via Discord:
Hooking up the partcooling fan was fairly simple (as it is basically in the manual,… go figure…)
in printer.cfg:
[fan]
pin: fan_part_cooling_pin
cycle_time: 0.00004 #25kHz
tachometer_pin: ^PC13 # Made up pin name, look up your boards pinout diagram to get the pin name for the pin you’ve chosen
tachometer_poll_interval: 0.0005 # will support up to a 30.000 RPM fan with 2 pulses per rotation.
While in /config/boards/btt-manta-m8p/config.cfg I now have under aliases
# fans
fan_toolhead_cooling_pin=PE0, #FAN1 (blue)
fan_part_cooling_pin=PE4, #FAN4 PWM (blue)
fan_controller_board_pin=PB8, #FAN5 PWM (blue)
Toolhead cooling fan I have not tested and controller board is also a WIP.
LikeLike
Nothing …….
After completing the initial install ….
“Exit Kiauh.
Run the following set of commands. This will update your moonraker.conf file. You can copy the whole set of commands at once and paste them. They will run consecutively as if you entered them a line at a time.”
I am getting the “No such file or directory” for EVERYTHING after
I copy/pasted ALL from the listings above right down to setup.sh
Allowing for each to finish …..
“Originator of the guide knows more than me about this so must be the right order” was my thinking
So after the last fail, I went via WinSCP to view directory
And can confirm
NOT a single one of the directories or files, that were meant to be created, was created
LikeLike
Yes I had the same problem. There is an error in the first line, it should be:
mkdir -p /home/pi/klipper_config/config
This command is trying to make the config folder in /home/pi/klipper_config but the klipper_config folder does not yet exist so the command fails.
Adding the -p option tells the command to create any missing parent folders.
LikeLike
Mailsail “Cannot connect to Moonraker” after CB1 is powered off and restarted.
LikeLike
Yep same thing happened to me. In the ~/klipper_config/moonraker.conf file make sure your [server] section has the unix domain sock entry. It should look like this:
[server]
klippy_uds_address: /home/pi/printer_data/comms/klippy.sock
LikeLike
I’ve created a script that runs the whole RatOS build system on a booted CB1 if that helps anyone. You can find it here: https://github.com/koder-guy/RatOS-on-CB1
LikeLike
That’s awesome!
LikeLike
MAN, I am fighting an install with above guide for days now (failing to finalise and see all the macros and stuf). Just loaded your script, went for Tea, came back and BAM!!! Bob’s your uncle!. Super clean. Thank you!
LikeLike
Thanks, glad it helped someone out.
LikeLike
I did notice that it appeared to have installed 2 instances of klipper,… Is that correct? I installed KIAUH and that showed me 2 instances…
LikeLike
This script should only really be run on a clean install of the CB1 image, the “CB1_Debian11_bullseye_minimal_kernel” image not the “CB1_Debian11_bullseye_Klipper_kernel” image. I wouldn’t go installing kiauh as well or installing over the top of an existing kiauh installation. The script runs the “klipper” module only once so it should produce only one instance. If you’ve also installed it with kiauh then yes you may end up with 2 instances.
On my system
ls -al /etc/systemd/system/ | grep klip
-rw-r–r– 1 root root 588 Jan 22 19:28 klipper-mcu.service
-rw-r–r– 1 root root 636 Jan 22 18:38 klipper.service
ps aux | grep klip
root 419 0.0 0.0 2440 596 ? Ss Jan24 1:09 /usr/local/bin/klipper_mcu -r -I /tmp/klipper_host_mcu
pi 768 8.8 3.0 258484 31132 ? Ssl Jan24 112:45 /home/pi/klippy-env/bin/python /home/pi/klipper/klippy/klippy.py /home/pi/klipper_config/printer.cfg -l /home/pi/klipper_logs/klippy.log -a /tmp/klippy_uds
pi 780 2.9 5.4 711532 55228 ? Ssl Jan24 37:51 /home/pi/moonraker-env/bin/python /home/pi/moonraker/moonraker/moonraker.py -c /home/pi/klipper_config/moonraker.conf -l /home/pi/klipper_logs/moonraker.log -d /home/pi/printer_data
LikeLike
Please adapt to orangepi 3lts, thank you very much
LikeLike
this doesent work for me?
git clone https://github.com/Rat-OS/RatOS-configuration.git config
sed -i ‘s/.*raspberry_pi.*/[temperature_sensor orange_pi]/’ /home/pi/klipper_config/config/printers/base.cfg
git clone https://github.com/Rat-OS/RatOS-theme.git .theme
cd /home/pi
git clone https://github.com/Rat-OS/RatOS-configurator.git ratos-configurator
cd ratos-configurator/
git checkout deployment
LikeLike
I need to update this blog now – the manta boards are supported in the v2 ratos beta. That is now the recommended way to install it!
LikeLike