
If you happened upon this article or series of articles from some point in the future you may wonder why I and many others invested so much time into finding ‘things’ that could run Klipper. Well remember that COVID thing? At this point in time most of the world is past the national lock down stages and trying to get back on with life. Unfortunately the manufacturing industries haven’t fully recovered and getting hold of a Raspberry Pi has been challenging for quite some time now. Many people have resorted to back alley scalpers and AI stock finding algorithms, but demand is not being met. To satiate the desire to print faster and to Klipperise everything there is a need to know what other devices can be used instead.
Unfortunately this tutorial is unlikely to solve the RPi crisis and I should really have sat down to consider if I should do this rather than could I do this. Anyway I have managed to get a working Klipper installation on a Windows PC using the windows subsystem for Linux (WSL) tool. I see this as a useful tool for connecting up a board to test and mess around with it rather than a permanent solution for running your printers (Although I would love someone to prove me wrong here). Waffle aside lets get stuck into the tutorial.
Warning this method will required you to have WSL and your Windows PC running the entire time you are printing. You may or may not get USB disconnects when WSL window is closed, I haven’t tested the reliability or actual prints with this method yet!
BOM
- Patience
- USB cable to connect control board to PC
Installing WSL
Quickly before we do actually get started I should answer the question of what is WSL? The Windows Subsystem for Linux lets developers run a Linux environment — including most command-line tools, utilities, and applications — directly on Windows, unmodified, without the overhead of a traditional virtual machine or dualboot setup.
For most people that probably meant nothing but I felt like I should include it. Installing WSL is very straight forward. Documentation is provided in full here but read on for the basic steps to get started.
Open command prompt as administrator and run the command below
wsl --install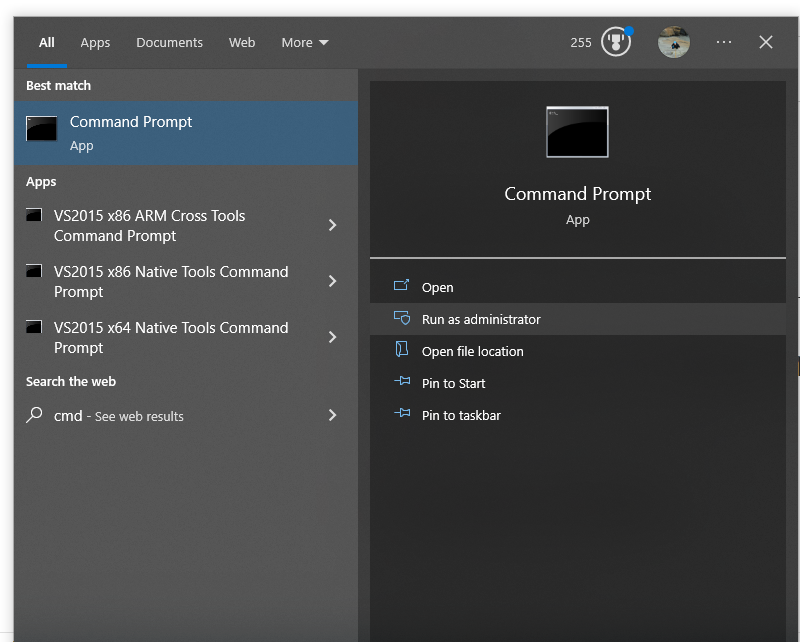
WSL will start to install. Wait for it complete, this can take quite a while as it will automatically download and install Ubuntu at the same time. Other Linux OS are available on the Microsoft store.

Once complete you will be notified that changes won’t be applied until a reboot has occurred. Please go ahead and reboot your PC. When it starts back up the installation should automatically continue and an Ubuntu window will open. Enter a username and password.

You should be greeted with the welcoming sight of an Ubuntu command line interface.

Open the command prompt back up and lets update WSL before we get any further. Shut WSL down then launch it again (Ubuntu should appear like any other program in your menu now) for the changes to take effect.
wsl --update
wsl --shutdown
Preparing Windows
Unfortunately WSL does not automatically have access to USB devices or serial communication ports. Thankfully someone clever has added a tool to make that possible.
In the command prompt enter the command below to install usbipd (run as administrator again)
winget install usbipd
Plug in a printer control board to your PC. Check that you can see the COM port in the device manager. It is COM8 for me.

Run the following command and take a note down of the BUSID for your control board. Mine is ‘1-12’

Depending on your setup and whether or not you have used WSL previously and/or docker you may need to set Ubuntu as your default. run the command below to check. If it is not the default use the second line to set it to be the default. You can run the first command again to check it worked.
wsl --list
wsl --setdefault Ubuntu
wsl --list
sudo apt install linux-tools-virtual hwdata
sudo update-alternatives --install /usr/local/bin/usbip usbip `ls /usr/lib/linux-tools/*/usbip | tail -n1` 20
Now you need to attach the USB device to WSL. Run the command below in CMD prompt. The device should have disappeared from your device list now.
usbipd wsl attach --busid=1-12
Check that it is not visible in WSL. Run the command below in Ubuntu. You can see the results of running this command before and after attaching the USB device below. An STM32 device has appeared which is perfect as I know that is the processor on my control board.
lsusb
Inside Ubuntu run the following two commands. You will be prompted for the sudo password. Enter the one you set when you created your user at the start. Press y when prompted to continue the installations.
Configuring Ubuntu
Quickly install net-tools as we will use them later to get the IP address.
sudo apt install net-toolsNow the biggest issue with trying to run Klipper on WSL is that it the OS does not support systemd which is used by most services (klipper, moonraker etc.) in the background. Thankfully again someone far cleverer has found a hack to enable this to work!
Start off by installing the dependencies in Ubuntu. Again use Y to accept the installations.
sudo apt update
sudo apt install dbus policykit-1 daemonize
Create an interceptor that catches the systemd calls and sends them to the right place. (I’ve changed the text editor to nano because I find it easier to use than the one advised by the Github readme.)
sudo touch /usr/local/bin/wsl2hack
sudo chmod +x /usr/local/bin/wsl2hack
sudo nano /usr/local/bin/wsl2hack
The commands above will end by launching a text editor (nano). Paste the following code in but make sure to update your username. in the 3rd line with the one you set when installing Ubuntu. when done hit ctrl + X and then y and finally enter to save the changes.
#!/bin/bash
# your WSL2 username
UNAME="<YOURUSER>"

UUID=$(id -u "${UNAME}")
UGID=$(id -g "${UNAME}")
UHOME=$(getent passwd "${UNAME}" | cut -d: -f6)
USHELL=$(getent passwd "${UNAME}" | cut -d: -f7)

if [[ -p /dev/stdin || "${BASH_ARGC}" > 0 && "${BASH_ARGV[1]}" != "-c" ]]; then
    USHELL=/bin/bash
fi

if [[ "${PWD}" = "/root" ]]; then
    cd "${UHOME}"
fi

# get pid of systemd
SYSTEMD_PID=$(pgrep -xo systemd)

# if we're already in the systemd environment
if [[ "${SYSTEMD_PID}" -eq "1" ]]; then
    exec "${USHELL}" "$@"
fi

if [[ -z ${SYSTEMD_PID} ]]; then
    # start systemd
    /usr/bin/daemonize -l "${HOME}/.systemd.lock" /usr/bin/unshare -fp --mount-proc /lib/systemd/systemd --system-unit=basic.target

    # wait for systemd to start
    retries=50
    while [[ -z ${SYSTEMD_PID} && $retries -ge 0 ]]; do
        (( retries-- ))
            sleep .1
            SYSTEMD_PID=$(pgrep -xo systemd)
    done

    if [[ $retries -lt 0 ]]; then
        >&2 echo "Systemd timed out; aborting."
        exit 1
    fi
fi

# export WSL variables
export WINPATH="$(echo "$PATH"|grep -o ':/mnt/c.*$'|sed 's!^:!!')"
RUNOPTS=""
RUNOPTS="$RUNOPTS -l"
RUNOPTS="$RUNOPTS -w WINPATH"
RUNOPTS="$RUNOPTS -w WSL_INTEROP"
RUNOPTS="$RUNOPTS -w WSL_DISTRO_NAME"

# enter systemd namespace
exec /usr/bin/nsenter -t "${SYSTEMD_PID}" -m -p --wd="${PWD}" /sbin/runuser $RUNOPTS -s "${USHELL}" "${UNAME}" -- "${@}"
Run the follow command. Choose 1 (nano) and then add rootwsl:x:0:0:root:/root:/usr/local/bin/wsl2hack as the first line in the file. DO NOT change or delete anything else. ctrl + X, y and enter to save changes.
sudo vipw

Now repeat the last steps but using the command below.
sudo vipw -sClose Ubuntu. Use the CMD prompt to shut it down.

Next we need to set the default user to root for the script to work and simulate systemd on startup. Again in CMD prompt run
wsl --shutdown
ubuntu config --default-user root
Launch Ubuntu and check that everything is working by running the command below. You should get the response active and be logged into the user you set up rather than the root user.
systemctl is-active dbus
Installing Klipper
Now is the easy bit. It’s time to install Klipper using KIAUH like we are accustomed to. Also a big thank you to th33xitus for firstly developing and maintaining KIAUH and secondly for giving me a pointer on the systemd side of things to get this to work!
Run the following commands in Ubuntu
cd ~
git clone https://github.com/th33xitus/kiauh.git
Next start up KIAUH and install the components in the following order Klipper -> Moonraker -> Mainsail (or Fluidd if you prefer).
Get the ip address of the device by running the command below. Look for the inet line under eth0.
/sbin/ifconfig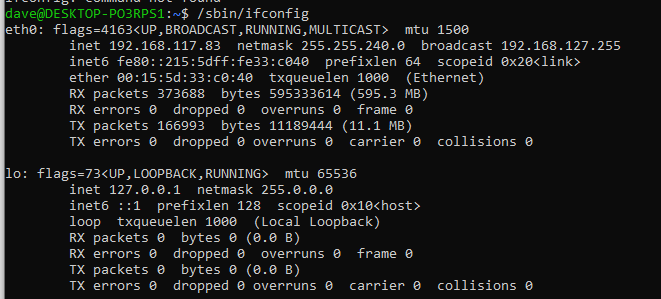
Enter this into your web browser and boom you should have klipper!

As per usual the MCU can’t be found because we need to configure the printer.cfg. However first make sure your usb device is mounted. in CMD prompt run the following command (modified based on the code you wrote down near for the bus id earlier)
usbipd wsl attach --busid=1-12 In Ubuntu run the command below to get the id of the device. Paste this ID into your printer.cfg file (using the mainsail UI) and that’s it your ready to Klipper!
ls /dev/serial/by-id/*


Sorry. How do I retrieve the klipper.bin file from this method? SKR 1.4T but KIAUH refuses to flash or send the file to the SD card via USB. How can I retrieve the file manaully? Thanks.
LikeLike
Oh I got it. “\\wsl$” in any explorer window. No other neathod was working for me. What a pain in the butt! Gonna go with a Orange Pi. This will have to do until I can get one.
LikeLike
Hello Dmason. first of all thanks fo this tutorial it help me a lot in configuring klipper on WSL however whenever I restart my laptop, Mainsail become unreachable. The only workaround to access it again is to reinstall mainsail through Kiauh, did you encounter this issue as well or do you have any permanent solution ? Thanks !
LikeLike
Yes unfortunately WSL shuts down when you turn off the pc. You should be able to launch the same WSL session and then run sudo service klipper start
LikeLike
Is this done by launching Ubuntu and then running the command?
LikeLike
Is there a way to run wsl @ windows startup and the klipper start command automatic? like a batch or something ?
LikeLike
try the examples listed here.
https://superuser.com/questions/1343558/how-to-make-wsl-run-services-at-startup
I haven’t tried it though.
LikeLike
Whenever the printer is disconnected or turned off from the computer and then re-connected WSL doesn’t see the device until I re-enter the command: usbipd wsl attach –busid=1-12
Is there a way to automate or get around this issue?
LikeLiked by 1 person
Yes I experienced this behaviour as well.
Autorunning things when a usb is plugged in was removed as a security risk from windows a whole back.
You could try having a background service running in windows checking.
http://answers.microsoft.com/en-us/windows/forum/windows_vista-windows_programs/task-scheduler-how-to-automatically-synchronize-my/45a49d83-b1d8-4d37-8896-3d2696cf9795
LikeLike
i get to this:
wsl –shutdown
ubuntu config –default-user root
and then ubuntu never boots again, doesnt matter if i reboot pc or not…
LikeLike
it doesn’t reboot automatically. Are you saying that when you open ubuntu WSL window it won’t run and crashes or gets stuck? I haven’t seen that before
LikeLike
same here
LikeLike
Now repeat the last steps but using the command below.
sudo vipw -s
after doing the above step ubuntu just crashes as soon as it launches…..
LikeLike
I have everything installed, when I go to get the device ID again it says “usbipd: error: WSL kernel is not USBIP capable; update with ‘wsl –update’.”
WSL is already updated…
It connected in the very beginning prior to doing all the command line work. Anyone else run into this issue? Literally spent my whole day trying to find a work around, but doesn’t wanna budge lol.
LikeLike
I figured it out. Everything is working, thank you!
LikeLike
Can you share your fix? It will help others if they also get stuck,
Sorry I didn’t have time to help, the blog is on the back burner whole I renovate a house!
LikeLike
PS C:\WINDOWS\system32> ubuntu config –default-user root
id: ‘’: no such user
id: ‘’: no such user
runuser: user does not exist or the user entry does not contain all the required fields
Error: 0x80070057 The parameter is incorrect.
is this because i put in wrong user name in nano editor? now ubuntu auto close when i open it.
how to revert this?
LikeLike
I got to the shutdown step right before installing klipper and now Ubuntu crashes when I try to run it. Im pretty sure this is the same problem you have. Have you figured it out?
LikeLike
Im having the same issue.
LikeLike
i figure out to unregister ubuntu in wsl first
in powershell admin, run:
wsl –shutdown
wslconfig /unregister ubuntu
wsl –install –distribution ubuntu
then this can fix the Failed attach disk C:\ error above mention.
create new user, now i can start over…
wish me luck
LikeLike
I cant access klipper using the IP over the network. I have it set up on a laptop and want to access it from my computer on the same network. It just says the site can’t be reached? Any solution?
LikeLike
After I do default user root Ubuntu crashes as soon as I open it any help appreciated
LikeLike
Honestly I would wait a few weeks and I will release the tutorial to use Virtual Box which should make all these things a lot simpler
LikeLike
Any news on the VirtualBox tutorial?
LikeLike
Apologies time got away from me. I got it working but I wasn’t happy with all the steps I’d done so wanted to make a clean image I could share
LikeLike
for launching kiauh, use the command :
./kiauh/kiauh.sh
LikeLike
Thank you for posting this. I ran through everything successfully but get this in the mainsail GUI.
Printer is not ready
The klippy host software is attempting to connect. Please
retry in a few moments
Any idea?
LikeLike
Have you connected your printer board? And followed the steps to enable the usb port to be visible in WSL?
LikeLike
Yes.
LikeLike
Do I need to flash the printer board itself?
LikeLike
Yes you will do, if the klipper firmware isn’t running on that board the WSL side will have nothing to communicate with
LikeLike
I get to this point /sbin/ifconfig and then nothing, the IP addres provided does nothing, shows the message that the web page cant be access
LikeLike
Can you try pinging the ip address from your regular pc terminal?
LikeLike
there is ping resolve on that ip, so it appears to be working but not accessible
LikeLike
I’d guess it’s not serving up the correct port then which is odd.
LikeLike
any suggestions on how to proceed next? maybe start over?
LikeLike
I think that is worth trying. Make sure you haven’t missed any steps. I don’t remember ever having that issue
LikeLike
im new to this. Could you guide me trough how to do a wipe an start all over?
LikeLike
after i get the ip address nothing shows on the broser, web page unaccessible.
LikeLike
Managed to get this to work on ubuntu 22.04 on wsl2 on a tiny11 tablet.
after the
“sudo apt update
sudo apt install dbus policykit-1 daemonize”
part, you can follow the official steps from microsoft to set up systemd on wsl2https://devblogs.microsoft.com/commandline/systemd-support-is-now-available-in-wsl/
continue from installing klipper
I havent tested it extensively but it has connected.
Not sure how feasible it will be running this on 4GB of RAM it seems to maxing out with a single browser page open. Unless there is a linux distro that supports touch well, this the only way to a good touch only fluidd interface.
LikeLike
I install the usbipd and it says successful . but the command usbipd list gets the result usbipd is not recognized as an internal or external command, operable program or batch file. what do I do ?
LikeLike
It looks like you don’t have it installed. Run “winget install usbipd”
LikeLike
So I did that and got the installed successfully. Then I tried it again and it was a yellow message saying it’s already installed.
LikeLike
What command exactly are you trying now? Once installed you should just be using “usbipd list” to find them, this shouldn’t try install anything
LikeLike
now the whole sudo apt install linux-tools-virtual hwdata is giving me error 404. it goes ign 1 then ign 2 then ign 3 then ign 4 then err 1 err 2 etc…. and it says jammy-updates/main amd64 but im using an intel laptop does that matter?
LikeLike
Just did it and it worked i forgot to restart my laptop lol
LikeLike
Como consigo o arquivo klipper.bin para flashear a minha impressora?
LikeLike
I managed to get Klipper working in Linux Mint inside a HyperV virtual machine on my windows 11 desktop.
Was just as easy or difficult as installing Klipper on a standalone Linux machine.
Cheers,
Heiko
LikeLike
If you would like to do a quick writeup I’d love to add it to my list! (If you don’t have somewhere to do that I’d happily post it with credit to yourself)
LikeLike
I’ve followed this tutorial successfully months ago, now I’m trying to install on a different computer and am getting 404 errors when I run the command
sudo apt install linux-tools-virtual hwdata
LikeLike
Hmm 🧐🤔 that doesn’t sound like a familiar error
LikeLike
####################################################
FIXES/SOLUTIONS to some problems..
####################################################
First, thank you so much for this guide! Truly appreciated 🙂
I did get stuck in a few areas on 2 different machines. Here’s how I solved them:
– If you get an error “Unable to fetch some archives, maybe run apt-get update or try with –fix-missing?” after running “sudo apt install linux-tools-virtual hwdata”, try “sudo apt-get update”, then try “sudo apt install linux-tools-virtual hwdata” again.
– After running “ubuntu config –default-user root”, if you get “rootwsl@dave-Desktop:/home/dave#” instead of “dave@DESKTOP-PO3RS1:~$”, try “su – dave” (replace “dave” with your username) to switch back to “dave@DESKTOP-PO3RS1:~$” before you install KIAUH, otherwise you will not be able to run KIAUH after you install it (I forgot what error you’ll get).
– After installing KIAUH “git clone https://github.com/th33xitus/kiauh.git“, you run it by running “./kiauh/kiauh.sh”
– After you’re done installing Klipper and Moonraker and Mainsail/Fluidd, hit B then Q to exit (obvious steps, but just adding it for completion).
I hope this helps others.
Thank you again for the awesome guide!
LikeLike
Really appreciate the time you took to provide this feedback!
LikeLike
Anyone started getting errors when trying to mount the printer? I put in:
usbipd wsl attach –busid=8-1
As I’ve been doing for months and just today started getting back:
usbip: error: import device
usbipd: error: Failed to attach device with busid ‘8-1’.
I’ve tried updating usbip, I’ve tried making sure everything on Linux is up to date as far as I can tell. I’ve restarted my computer and the printer multiple times.
I don’t know if there was a recent update that broke the whole process but I’m not able to find a way to fix it.
LikeLike
Yeah same here, no idea why. I’ve got it working by doing the following:
– In CMD do ipconfig to get the IP address used for WSL
– In Ubuntu do usbip list -r to get a list of devices
– In Ubuntu do sudo usbip attach -r -b X-X replacing the Xs with the busid
LikeLike
Sorry, step 2 should be usbip list -r *IP address*
LikeLike
and step 3 sudo usbip attach -r *IP address* -b X-X – site didn’t like my chevrons
LikeLike
Grrr, site doesn’t like chevrons – step 3 should be:
sudo usbip attach -r *IP address* -b X-X
LikeLike
Brooooo thank you! Holy crap that worked. I tried so many things and just could not get it but this did it! Awesome! Thanks again.
LikeLike
You’re welcome my dude. I think something must’ve updated recently and broken it, I tried asking the dev of usbipd-win but haven’t got any further yet – linking from WSL doesn’t seem as reliable as linking from Windows, I’m running 4 printers and I’m having more issues than I used to….but at least it works!
LikeLike
Hey!
First off, this guide is really good and it helped me setting up Klipper really quickly.
Second, I’ve been using this for a few weeks now it it seemed fine but after restarting the PC I’ve been starting to get this error:
“Klipper reports: SHUTDOWN
MCU ‘mcu’ shutdown: Timer too close”
Any one had something similar?
Any way to fix this?
Thank you!
LikeLike
I found I always needes to run the steps to link the USB port to the WSL instance after each time I fully shut down.
I believe there is an easier way using virtual box where the user would just be able to download the image and it be ready to use.
Unfortunately I’ve not had the time this year to contribute much to my blog 😕
LikeLike
Hey, thanks for your reply!
I wasn’t actually talking about attaching the USB port to WSL
I meant that when printing it could suddenly stop printing with the error “Klipper reports: SHUTDOWN
MCU ‘mcu’ shutdown: Timer too close”
I don’t mind reattaching the USB everytime the connection is dropped honestly, I just want it to work 😦
LikeLike
That normally means host device is overloaded. Can you allocate klipper more resources?
https://dev.to/abhijithganesh/how-to-configure-your-wsl-resources-594m
LikeLike
I tried doing that, gave it 8 cores and 8 gigs of ram and still, it happened again 😦
LikeLike
Well, the only time I got it to work reliably is when I installed Ubuntu on my PC to test it (I tried VMWare but it didn’t work and VMBox was causing BSODs)
Seems like I have to buy a separate machine to make this work, probably a Raspberry Pi 3b+.
LikeLike